How to build a membership site with Webflow and Outseta
Outseta easily integrates with Webflow so that you can sign-up new users, allow them to login to your website, and give them the ability to manage their subscription or membership—all without writing any code.
While there are many membership software providers that integrate with Webflow—and Webflow also offers their own membership tools—Outseta is the only all-in-one tech stack that gives you everything you need to run a membership business. In addition to membership payments, protected content, and login functionality Outseta also provides a robust CRM, email marketing, help desk, and reporting tools. More on the benefits of building your membership site with Webflow and Outseta can be found here.
Outseta integrates with Webflow via embed codes—here's an overview of each.
Sign-up embed—Allows users to choose from your membership options and sign-up.
Login embed—Allows users to login to your site with an email address/password or Gmail account.
Profile embed—Allows users to manage their own account information, upgrade or downgrade their membership, maintain their payment information, and invite new team members.
These embeds can be implemented to open as pop-ups when a link or call-to-action button is clicked on your site, or they can be directly embedded into a website page.
This tutorial will walk you step-by-step through the process of creating a membership site on Webflow using our Webflow demo site:
Before you can use the sign-up embed you need to:
- Go to BILLING > SETTINGS and connect Outseta to Stripe.
- Go to BILLING > PLANS and add at least one pricing plan.
- Go to AUTH > SIGN UP AND LOGIN and complete the other sign up and login settings. The video above gives an overview of each of these settings.
With these steps completed, you're ready to integrate Outseta's sign-up, login, and profile embeds with your website.
Open the sign-up, login, and profile embeds as pop-ups
The easiest way to integrate Outseta with your site is to open our sign-up, login, and profile embeds as a pop-up when a call-to-action button or link is clicked.
Start by adding sign up, login, and profile buttons or links somewhere on your site—you should also add a logout link. Your logout and profile buttons or links will only display when users have logged in to your site successfully.
With these items in place, integrating Outseta takes about 2 minutes!
1. Go to AUTH > EMBEDS and copy the Quick Start head script.
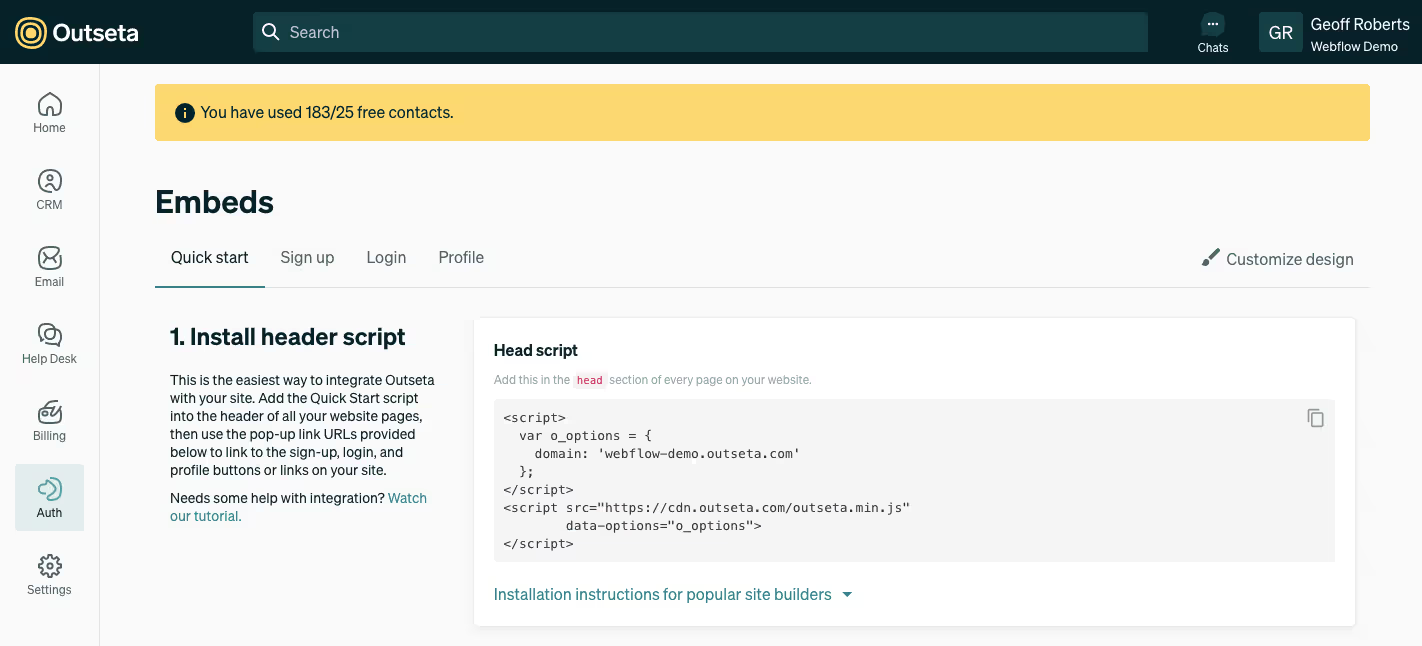
2. Within Webflow, go to PROJECT SETTINGS > CUSTOM CODE and paste the Quick Start head script into the header of all your website pages.
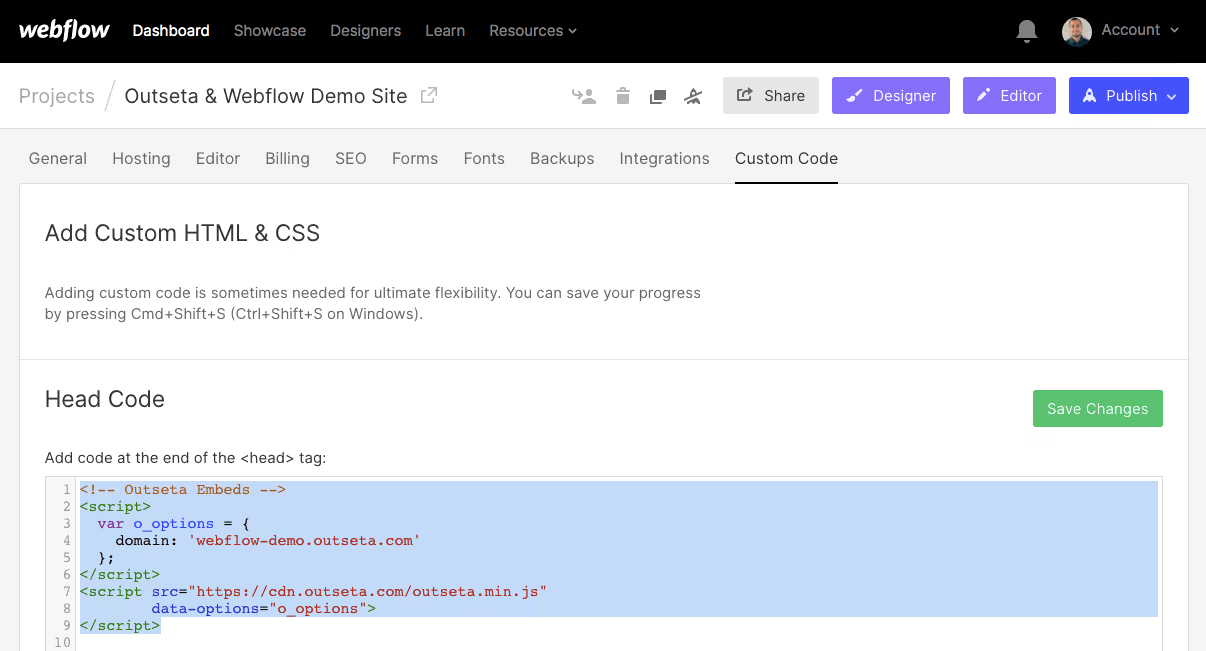
3. In your Outseta account, go to AUTH > EMBEDS and copy the sign-up link you find under the Quick Start header script.
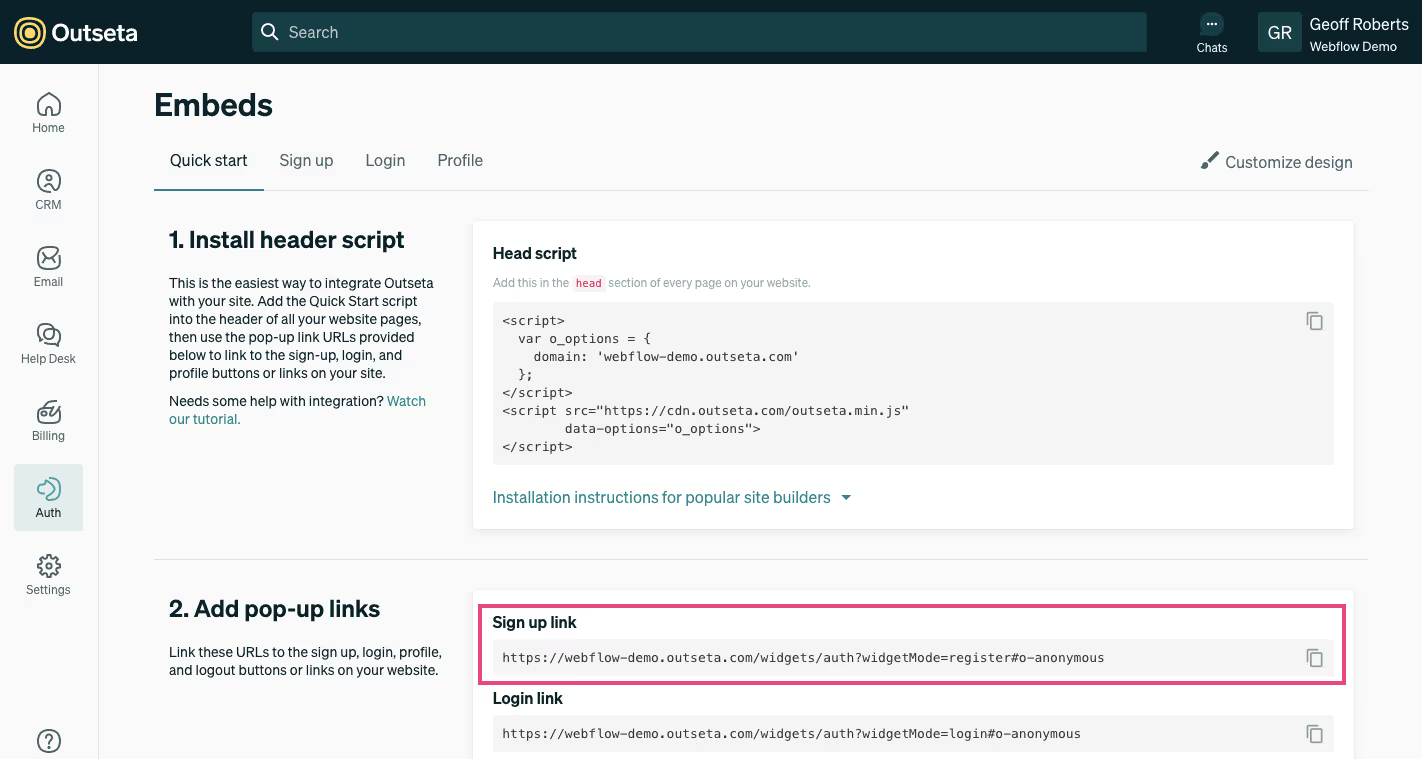
4. Back in the Webflow designer, click on your sign-up link or button and select the gear icon to open Element Settings. In the Link Settings section enter the URL of your sign-up link.
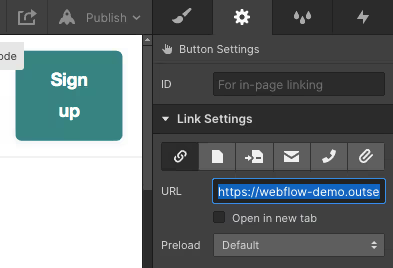
5. Repeat this same process for your login, profile, and logout buttons or links as well. PUBLISH your changes—Outseta is now fully integrated with your site!
If you've chosen to implement Outseta's sign up, login, and profile embeds as pop-ups you can skip the next section and proceed directly to setting up your protected content.
Embed the sign-up, login, and profile widgets on their own pages
Instead of using Outseta's Quick Start script to open the embeds as pop-ups, you can choose to embed the widgets directly into your website pages. If you choose to go this route:
- You do not need to add the Quick Start header script to your site.
- Consider adding dedicated /sign-up, /login, and /profile pages to your website before you start this process. You can also add these embeds directly within any of your existing website pages.
Follow the steps outlined below to embed the widgets in your website pages.
1. Within your Outseta account go to AUTH > EMBEDS. On this page you can select and work directly with the sign-up, login, or profile embeds.
In the screenshot below I've selected the sign-up embed. In the "Configure your embed" section you'll see I've selected the On a page option. You can also preselect the plans and payment terms you'd like to display—use these configuration options and you'll see the Live Preview on the right hand side of the screen update in real time to reflect the changes you've made to the sign up embed.
Once you've configured your embed script to your liking, click INSTALL YOUR EMBED.
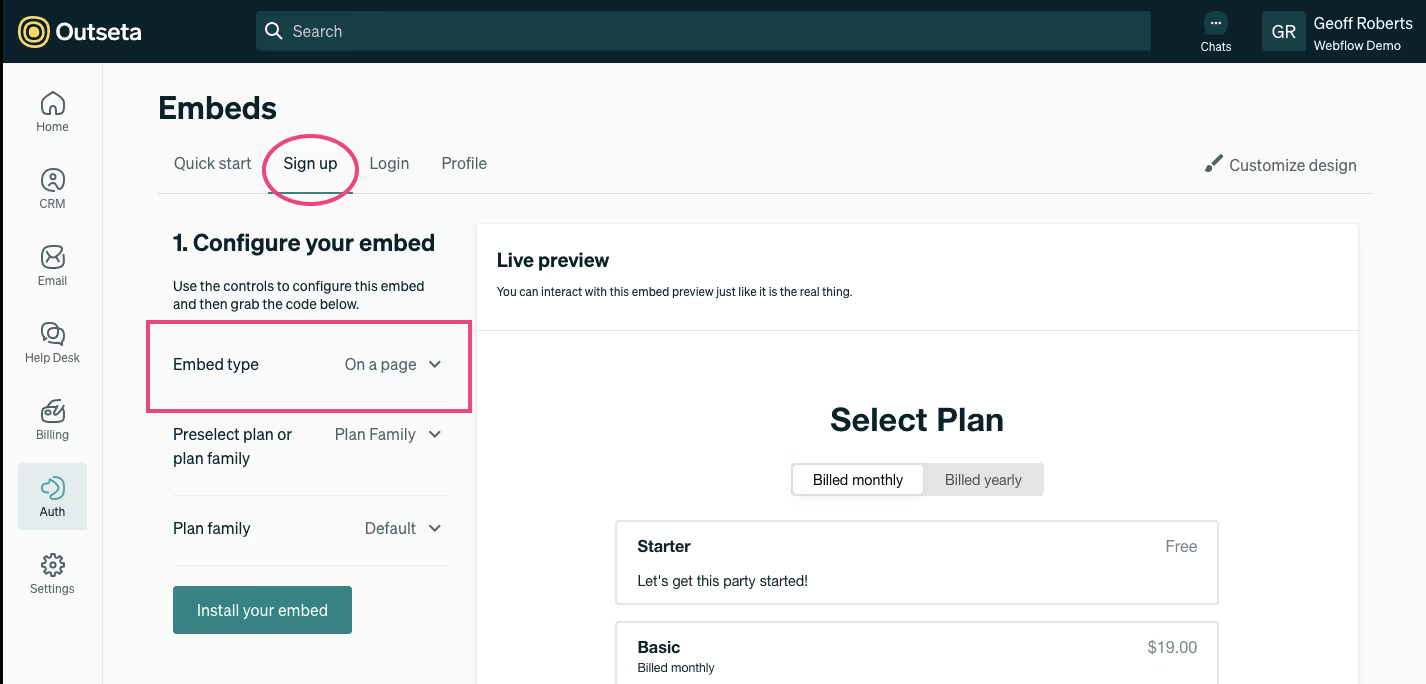
2. You can then grab the page script that you'll need to drop into your website pages at the bottom of the page.
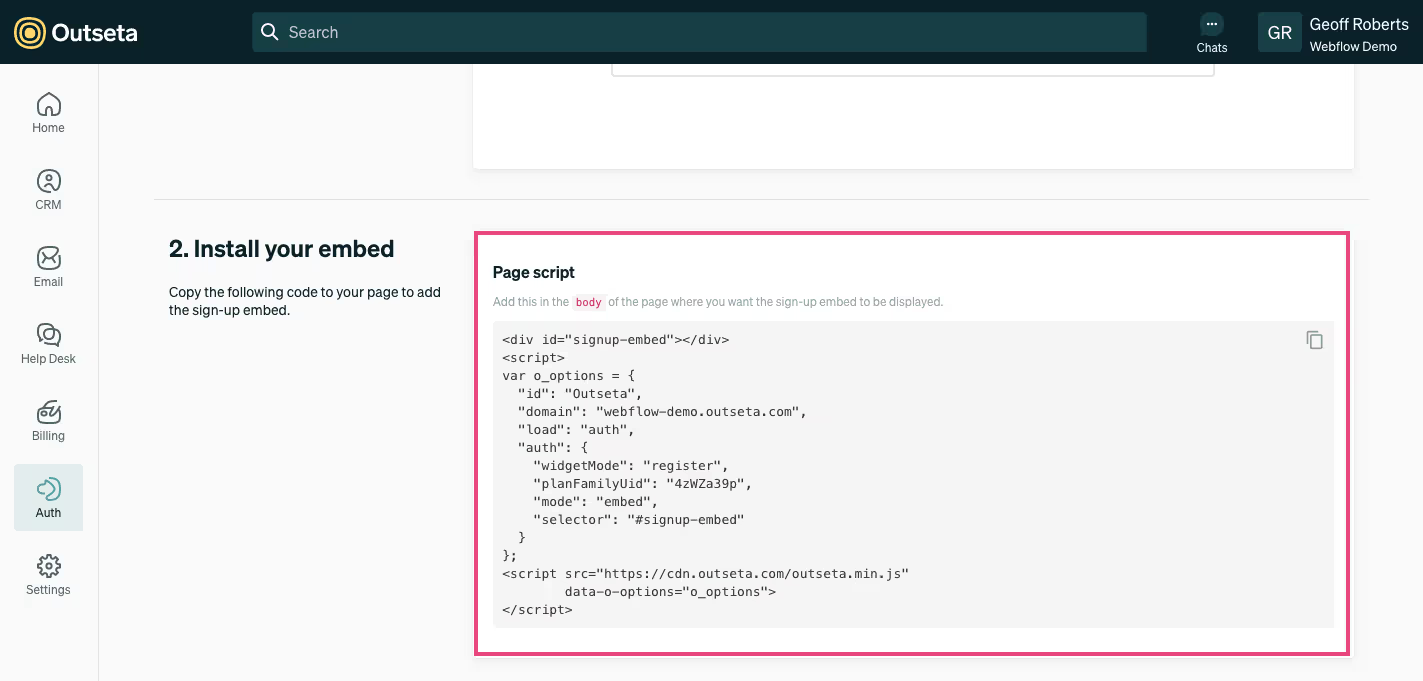
Complete this process for your sign-up, login, and profile pages.
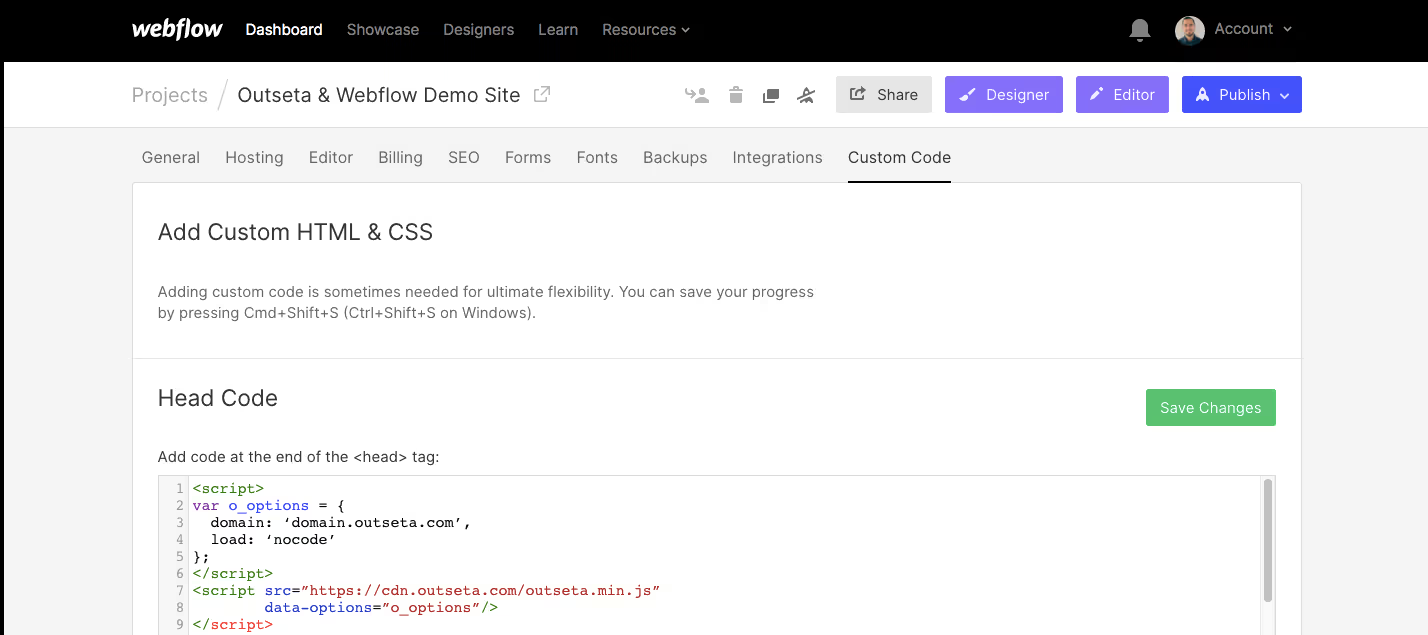
3. IMPORTANT—If you've chosen to add the embeds directly to your website pages rather than opening them as pop-ups, you need to add one additiona l script to the header of all your website pages in Webflow only if you want to use Outseta's content protection features. Most membership sites rely on Outseta's protected content features, so you'll likely want to complete this step.
Within Webflow go to PROJECT SETTINGS > CUSTOM CODE and add the following code to all of your website pages.
<script>
	var o_options = {
    	domain: "domain.outseta.com",
		load: "nocode"
	};
</script>
<script src="https://cdn.outseta.com/outseta.min.js"
	data-options="o_options"/>
</script>
You need to edit the code so that the bolded word domain reflects you Outseta login URL.
Set up your protected content
Follow the steps outlined below to set up your protected content. Using this method, you can have pages or folders of content that are only accessible to members who have logged in based on their membership plan.
1. Click AUTH > PROTECTED CONTENT from the left hand side bar.
2. Click ADD PROTECTED CONTENT to begin setting up you content restrictions.
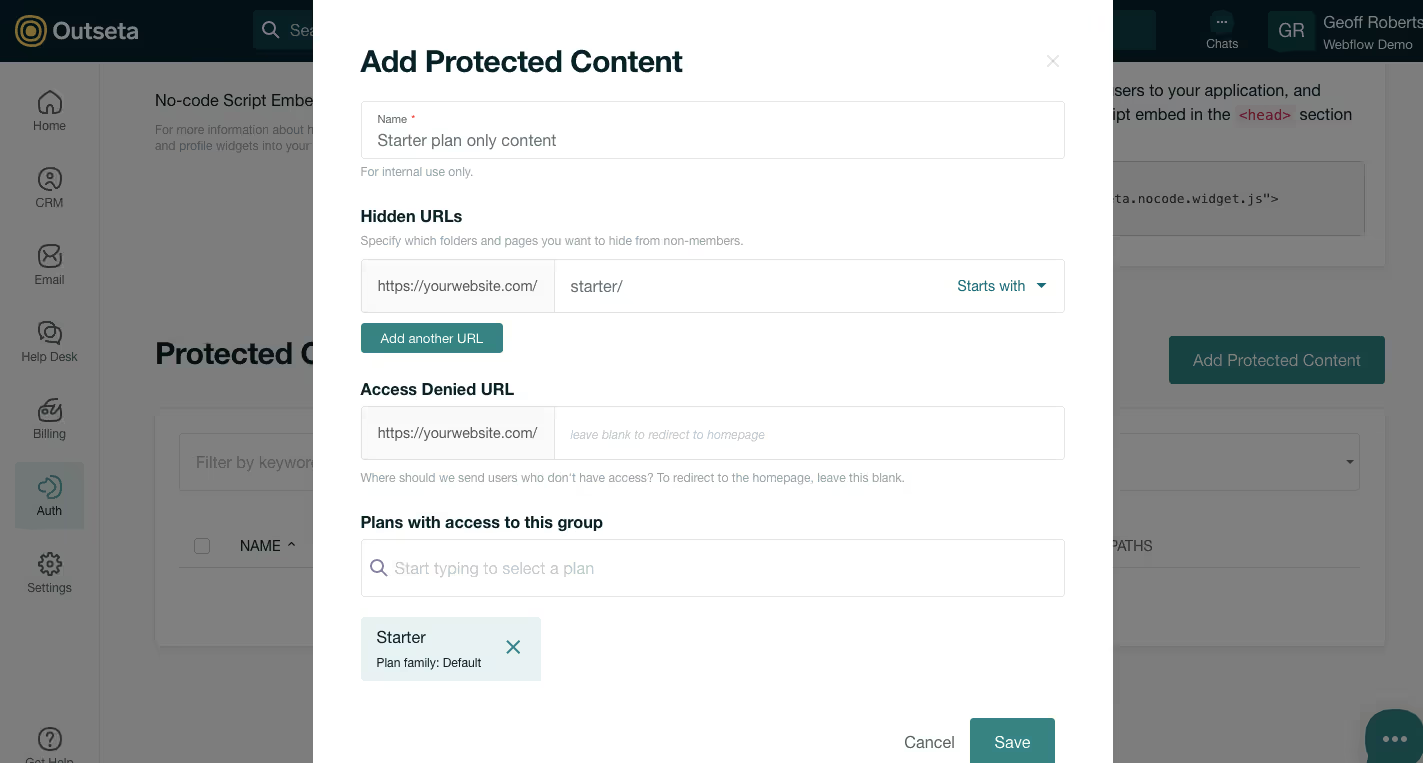
3. Add a Name that describes the content and who will have access to it.
4. Add Hidden URLs—these are the pages and folders that will be protected. Choose the "Starts with" option to protect an entire folder of content or "Equals" to protect a specific page of content.
5. You can also setup a Access Denied URL. This is where Outseta will redirect users who try to access protected content without the appropriate permissions based on their membership level or if they haven't logged in (authenticated).
6. Start typing to choose which of your membership plans have access to your protected content.
7. Click SAVE. Your content is now restricted based on the membership restrictions that you setup.
In addition to protecting content at the page or folder level, Outseta also supports two additional ways of protecting content on your Webflow site.
- You can chose to show or hide specific page elements from authenticated users. This allows you to protect your content at a more granular level—you can select any element on a page (a button, link, video, etc) and only display that element to members with the appropriate membership plan.
- You can set up account specific pages—these are pages of content that are protected so that only a specific member or group of members can access them. Account specific pages are typically used to create unique landing dashboards specific to each of your members—you can send members directly to their account specific pages upon login if you wish. Account specific pages are typically built on a Webflow CMS collection template.
Once you've set up your protected content, Outseta provides member engagement tracking tools so you can track which actions your members are taking on your mebership site.
Create custom activities to track member engagement on your site
Outseta also allows you to create custom activities—important actions that you want to know if members perform on your Webflow site. This is really helpful in tracking which members are engaging with your content—and how.
Follow the step outlined here to create your custom activities and track them directly on your CRM record for each member. This can be setup completely without code!
If you need any help building your membership site on Webflow, we'd be happy to help! Please email us at support(at)outseta.com.
On this page

